Patterns

Showing posts with label stitch. Show all posts

Wednesday, February 17, 2016

Thanks Mom!


My entire life I have been sewing, and doing embroidery or knitting and crotchet, thanks to my mom. I know she had me doing these things (before the times of cellphones and tablets) just to keep me out of her hair, in the end it made a big impact in my life. Being a third generation seamstress from a line of textile creative woman certainly helps, so it was no coincidence that I found my passion in creating clothing.

My business is my passion, and my baby and I am continually looking at ways of improving my products and ease of accessibility to them. I have recently installed the Shopify app on my Facebook page www.facebook.com/mysewingpatterns and I am currently testing it to see if it will work for you, my customers.

I have also added a few pages to my blog, so you can now purchase patterns directly from the blog, just click on the relevant page link to the right of the blog (or for mobile use the scroll down arrow alongside the home page bar) and it will take you to view the patterns you are interested in.

I really appreciate for those who purchase patterns through the store to please send me your feedback so that I know whether or not I am on the right track with this system. You can email your responses to mysewingpatternz@gmail.com Positive and negative feedback is welcome.

This week’s pattern in review


Mothers Day Handbag

Because my mother has played such a huge roll in my sewing success, last year to celebrate my her, I designed a handbag pattern for her and to share with all my sewing fans. Little did I know it was going to become such a hit.
It comes in two size variations and can be made in an assortment of fabrics. You can use a fun print for a stylish summer bag, or use a PU or leather type fabric for a more professional look.

Sunglasses pouch


And what’s a fashion handbag these days without an awesome, matching sunglasses pouch. This super easy sewing pattern is the perfect complement to any stylish bag.


Our February sewing challenge. It is “DRESSES”, very simple and easy, and you can make anything as part of the competition from a very simple LBD to a fancy wedding gown, the choice is yours! Remember to look up our previous post on the sewing challenge, so you know the rules and stand a chance to win that cute little Acer Chromebook!

Happy sewing!


Wednesday, January 20, 2016

JOIN OUR SEWING CHALLENGE AND WIN

Do you want to get more sewing done in 2016? Whether to practice and hone your skills, or to simply create a fun and affordable wardrobe for you, your friends and family? Then join our sewing challenge for 2016.

By joining our challenge you also stand the chance to win an Acer Chromebook. 

How do you join?
Every month we will be posting a sewing theme, for example for January the sewing theme is ties. Create a sewing project, in theme, take a picture and share it with us on twitter using the hashtag #MySewingPatterns


An example of how your tweet must look

There are a few rules of course:
  1. The projects posted on twitter must be from the Boo Lè Heart / My Sewing Patterns range of sewing patterns (CLICK HERE or click on the button to the right of the page to visit our online store).
  2. A new pattern theme will be tweeted every month, so remember to follow us on twitter @MySewingPattern
  3. Entrants can make any of the 12 themes supplied at ANY time during 2016, as long as you mention which month it is for. For example, you can still make your January tie in March 2016 or sew all 12 themes in the 12 days of Christmas, the choice is yours.
  4. You don't have to make a specific pattern, as long as it's in theme. For Example if the theme is "make a dress", you can make a dress from ANY of our available dress patterns.
  5. For an entry into the draw to win the computer, entrants must create at least 6 of the sewing challenges.
  6. Entrants who create all 12 challenges will receive 2 entries into the draw.
  7. The last sewing challenge must be shared with us on twitter no later than 30 December 2016. The draw for the winner, and announcing the winner on twitter will happen on 31 December 2016.

Feel free to add your own sense of flare and style to the patterns!

Here are the themes we have already been running during 2016:
January: Ties – sew any of our tie patterns
February: Dresses – sew any of our dress patterns
March: On Top – sew and share any of our tops, jackets, waistcoat... pretty much anything you would wear “above the belt”
April: Black and white – sew anything you wish from our patterns in this color combination
May: For The Ladies – make anything from our sewing patterns for women
June: Something for the Guys - use any of our men’s patterns for your entry
July: Anything Vintage, Pin-Up or Rockabilly style - bring those classic styles back to life
August: For the Home - Make something that makes your house feel like a home

Good luck and Happy Sewing!

Thursday, November 26, 2015

Silly season


Black Friday is tomorrow, and with the silly season ahead most of us are dreading popping into stores to do gift and seasonal shopping.

If you are anything like me, then you try to avoid it altogether, opting rather for online shopping, or better yet, creating gifts from the heart at home.

To help you get started, I have reduced the price of most of my sewing patterns down to a mere $1 for our black Friday sale (click on the button to the right of the page), including the drawstring bag which can be used as an ideal Christmas gift bag (see earlier tutorial on how to make your own iron on festive prints right at home).

My elves and I are busy scurrying away to finish a range of new patterns that I will be posted for you over the next couple of weeks, including bags and dresses that will create perfect outfits for the many gatherings you may have to attend this festive season.

If you need to go out, let your hair down and party… well then do it in style!

I will also be making more regular blogposts and free tutorials, so remember to follow my blog by email (window to the right of the page) to get all the latest updates right to your inbox.

Remember to like our Facebook page www.facebook.com/mysewingpatterns as I will be posting loads of specials, and perhaps even a flash sale or two over the next month, as well as images of patterns that will be available in store.

Brace yourselves for the exciting month ahead, and happy sewing!


Monday, September 7, 2015

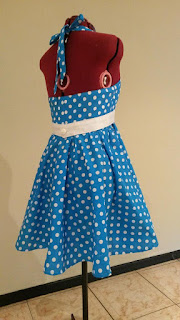
Add a waistband to your Rockabilly Style dress


Our Easy as Pie dress is incredibly cute on its own, but you are always welcome to give it a little extra something to have your friends and family complementing you on your sewing brilliance and stylish fashion sense.


Before and After

So to add a waistband to your Easy As Pie RockabillyStyle dress follow these few easy steps.

What you will need:
1.    The front and back bodice pattern pieces from your Easy as Pie Rockabilly dress sewing pattern (available in my online store, click on the button to the right of the page to buy yours now).
2.    25cm / 10” width of fabric of your choosing.
3.    25cm / 10” width of iron on interfacing
4.    25cm / 10” width of pattern tissue
5.    One to four buttons. The quantity of buttons you end up using will depend on how broad your waistband is and how big the buttons you choose are.
6.    Your completed Easy as Pie dress, in the size of your choosing.


Step 1: Place your pattern tracing paper over your back bodice pattern piece and trace the outline of the bottom of the pattern. 1.5cm / 5/8” above the bottom seam measure the desired width of your waistband. (I have gone for a 5cm / 2” width. Measure a further 1.5cm / 5/8” above this line for your seam allowance.

At the centre back seam add an additional 1.5cm 0r 5/8” to allow for an overlap for the button(s) and buttonhole(s)
\
Step 2: Do the same as above for your front bodice piece (except for the additional 1.5cm or 5/8”), only remember to exclude the dart from your waist band. Do this my measuring your waistband up the dart, then moving your pattern piece to continue after the dart again.


Make circles on the section where the dart would have been. You will be transferring these markings to your fabric to help you line up your waistband on your dress.


Step 3: Out of your waistband fabric cut four pieces of fabric for the back waistband pattern pieces. For the front waistband pattern piece, cut out two pieces of fabric on the fold.


Step 4:  Add iron on interfacing to the wrong side of two pieces of the back waistband section, and one piece of the front waistband section.


Step 5: Sew together the side seams of your waistband pieces and press open.


Step 6: Attach the waistband pieces together. Sew along the top and bottom seams and only one centre pack seam. Clip corners.


With the second centre back seam, measure 1.5cm / 5/8”, roll seam inwards and press into place. Loose tack to keep in place as you turn the waistband right way around.


Step 7: Turn waistband right way around and press. Stitch along the edge to finish off and to close the opening in the centre back seam.

Step 8: Make your buttonhole(s) and attach your button(s).


Step 9: With needle and thread catch your waistband onto your completed dress at the side seams and front darts.


Style tip: instead of stitching your waistband to your dress you can add press studs to the dress and waistband, making it detachable. This will allow for you to make an assortment of coloured waistbands that you can mix and match with your dress!

Step 10: Your dress is now ready to wear!

Happy Sewing!


Back of dress, before and after

Friday, May 22, 2015

Really Easy high waist shorts


I absolutely love my high waist, vintage style shorts. They are so quick and easy to make and I have made them in an assortment of colors for myself.


They should take no more than an two hours to make (if not one, depending on how prepared you are and how fast you work), and can be made in just 10 easy steps. 

I hope you enjoy this pattern as much as I do! Click on the button to the right of my blog to go to my online store and get yourself the digital version of this pattern now!


While making the denim pair for the instructions I was inspired to add some brass buttons I had lying around... the result was fabulous! Feel free to play around with embellishments for your shorts too, you can really have so much fun with these!


HAPPY SEWING!


Wednesday, May 20, 2015

Tacking or basting stitch


A loose, looped stitch used for tacking purposes, or as I call it, loose tacking. This is a simple, large hand stitch that is used in sewing, usually to hold something in place temporarily or to show pattern markings. It is also known as basting.


I am as guilty as the next seamstress, yes I have tried to use pins instead of tacking stitches before... usually it ends up with blood being drawn and machine sewing needles being broken... I might have even cried with frustration once or twice, but I can say I have learnt my lesson... and hopefully those reading this can learn from my mistakes too.

It can seem like a waste of time, and sometimes you might feel that it is better to use pins instead, this stitch helps not hinders. The short amount of time you would take to tack or baste something together, will help you save time and stress from fighting with your fabric while trying to feed it through your sewing machine, or fighting pins (and shedding blood) while trying to sew or even hoping that pressing will be enough to keep a seam in place so that it holds its shape and size (it often does not).

This is a temporary stitch and is meant to be removed once the garment has been completed, or the seam has been sewn into place.


It is usually a long straight stitch, but a loose X stitch can be used at times too.

This stitch can also be used to temporarily attach parts of the garment together to allow for fittings, that way when changes need to be made to individual parts of a garment, the stitches can be easily unpicked to allow for this to happen. This stitching function can also be done by machine, where you can sew using your largest, loosest stitch function.

You would also use tacking when it comes to creating gathers in a garment, quickly sewing a loose stitch and then pulling the thread through until the garment is the desired length with the right amount of gathering.


This is such a simple stitch, but I do feel it is important enough for me to mention it in a blog post as not only can it save you time and effort but it can and will help you to produce a better quality garment.

I have created a short you tube video for you to look at to see how to create a tacking stitch from scratch (click on the YouTube button to the right of the page), I hope it helps.


Happy Sewing!