Patterns

Tuesday, November 29, 2016

My top 5 sewing room injuries

 
The sewing work room can indeed be a very dangerous place to hang out. In fact when working away at a large project, it’s very seldom that I don’t injure myself at all, something I would call a feat indeed.
Here are the top 5 most memorable injuries I can remember from my years of sewing.
  • The wrong end of the pin going into my finger!
 
That’s right, I have had the wrong end of a metal pinhead go right into my finger. I remember staring at it for a moment, in shock, before pulling it out. I was young and still learning that not all pins do the same job!
  • Burned on the sewing machine light bulb
 
I was working late one night, and left the cover for my sewing machine light bulb open, to generate a bit more light... let’s just say that I now understand why the light bulb is covered, to protect busy hands underneath it.
  • Sewn my finger in the machine
 
Yes... I have done this. Luckily only a few stitches through the skin and no major damage, though it was painful enough.
  • Melted plastic from boning
 
I use solid ribbon boning for all my corset work, but when I cut it, it creates sharp edges that can push through layers of fabric, so I usually pass these through a candle flame, very quickly, to soften the corners so that I can round them. Though on a rare occasion I hold it under the flame too long, and instead of rounding the corners, I end up getting hot plastic melted onto my finger.
  • Raw hands from working with canvas
 
One of my favorite clients hired me to do a few patio chair covers in water proof canvas. It turned out to be a bigger job than I had initially planned and after three solid days of feeding canvas through the machine, my hands were so incredibly raw that I quite literally had to take a few days off to recover.

 Pattern of the week

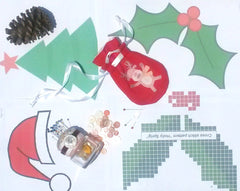
Envelope Style Gift Bag

 Christmas gift bag
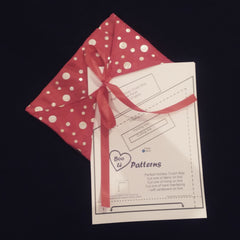
The festive season is upon us, and what better way to wrap your gifts this year than with this envelope style gift bag.
 envelope gift bag Christmas
This sewing pattern includes bags for sizes A6, A5, A4 and A3. So whether you want to neatly present a stocking filler, or something much bigger, then this is the gift bag for you!

Happy Sewing!

Tuesday, November 22, 2016

My top 10 unusual sewing supplies

The sewing room is indeed a strange place, in fact I enjoy shopping at hardware stores for  sewing supplies almost as much as I do at my local fabric store or haberdashery.
Today I wanted to share with you my favorite top ten, most unusual supplies that I use in my sewing room.
  • Glass Jars
 sewing supplies sewing pattern
This one is very simple and straightforward, I keep glass jars to help me to keep my working space organised. Gone are the days of searching among the piles and scratching in boxes, everything that can be organised into a jar is, and my life is much easier for it.
  • Zip lock bags
 sewing supplies sewing pattern
Again, this is for basic organisation, mostly of my buttons. These bags come in very handy, where before I used to have a box of, literally, thousands of buttons, and I used to find myself wasting hours scratching through it trying to find matching buttons.
  • Packaging polystyrene sheets
 sewing supplies sewing pattern
Along with the zip up bags, I use polystyrene sheets that come with any form of box packaging, along with blunted pins, I am able to sort out my buttons and see what I have on hand, this also prevents me from unnecessarily buying more buttons simply because I cannot see what I already have.
  • Lids
 sewing supplies sewing pattern
Lids from jars are also wonderful for helping to keep my work room organised. I love using these for the smaller items, such as chalk, or things that roll away or get lost easily. And as you can see, I love to use Marmite lids to store my measuring tapes, and they stack neatly on top of each other. No more twisted, stretched and disorganized measuring tapes.
  • Lids and foam from medicine bottles
 sewing supplies sewing pattern
The small round pieces of foam that come in tablet or vitamin bottles get glued into small lids to create perfect, cost effective, make shift pin cushions!
  • Pliers
 sewing supplies sewing pattern
My pliers are possibly one of my favorite tools. They help me to pull out pins stuck in thick fabrics, as well as helping me to pull through sewing needles that struggle to go through thick or hard fabrics. Holding onto boning while I push it through the casing, closing covered fabric buttons etc. These are just a few basic uses, but I promise if you invest in a small pair of pliers you will find a good number of uses for them while working on a sewing project.
  • Nuts and bolts

 sewing supplies sewing pattern
I use these as pattern weights. They really get the job done, and you can add or remove nuts to your bolts to make them lighter / heavier.
  • Washing line
 sewing supplies sewing pattern
I have a feeling that I may not be the only dressmaker with a few meters of washing line lying around in her workroom. This makes for a really good filler on piping, especially for outdoor furniture covers and cushions.
  • Cable ties / zip ties
 sewing supplies sewing pattern
Yip, cable ties of all lengths and thicknesses. Sometimes you may find that when creating a garment, that it could do with a little boning for extra support, but standard  ribbon boning is too thick and bulky to get the job done. Cable ties are generally a little more lightweight and flexible, and work great for projects that require just a little boning.
  • Hairspray
 sewing supplies sewing pattern
Because your hair should look great while you’re working... not only that but hairspray works really well towards helping to combat static. Especially when you are working with layers and layers of fabric and everything just becomes a huge static mess... sprits on a little hairspray to help reduce static and make your job so much easier.
You don’t want to overdo it with the hairspray though, just a light  spray should be sufficient.

 Pattern of the week

Easy Yoga Shorts Pattern

 
If you’re like me and you value comfortable, non tight fitting workout clothes, then you will love these. Not only are these yoga shorts incredibly comfortable, but they are extremely easy to make. you can make yourself several pairs, in a variety of colors in just one day... I did!

Animals in Need Gift Card

 
This year we are raising funds for various animal rescue centers by selling these really awesome gifts cards.
Each gift card is valued at $10, which the recipient can use for anything on our website, but you only pay $2 for it, so buy as a spoil for yourself or as a gift for the knitting or sewing fanatic in your life.
All proceeds from the sale of these gift cards will go towards animal welfare. Follow our Facebook page for updated posts on monies raised and charities helped!

 Happy Sewing!

Tuesday, November 15, 2016

Launch special and pompoms

We’re so excited here at NonStopCraft as today is the official launch of our eBook, “Make it Sew”, an essential guide for anybody looking to start a sew from home business.
make it sew sewing dressmaker seamstress
To celebrate our launch, we are offering a 20% discount to anybody who purchases the eBook today through our website, simply use the coupon code LAUNCHSPECIAL when buying your copy.
 Not only that, but everyone who purchases the book today only, will receive an 80% discount on the pre-launch special price for our January 2017 Basic Sewing course. So you will be paying only $3, for a course valued at ten times that. (details will be emailed to you on how to claim your discount after purchasing the eBook)
basic sewing course learn to sew
Speaking of loads of free stuff, we’ve also put together this tutorial for you on how to create some gorgeous, decorative Christmas pompoms for your decorations this year. These also make a great holiday activity for children during the festive season.

Tutorial of the week

 Christmas pompom Festive season decore
Making Christmas pompoms
What you will need
Cardboard
Pen
Scissors
Two 10 meter / 11 inch lengths of yarn, color of your choosing
50cm / 20” length of yarn, color of your choosing
Safety pin

Steps

Step 1:
On your cardboard mark out a circle that is 5cm / 2” in diameter. Inside that circle, mark a second circle of 2cm / 0.8” in diameter.
 
Cut it out and make a second cardboard cut out exactly the same.
 
Step 2:
Take your first 10 meter / 11 inch length of yarn fold it in 1 meter / 1.1” sections, so that it is 10 equal lengths.
 
Put a pin through the threads on one end, to help you thread your yarn around your circles.
 
Step 3:
Place your two cut out circles on top of one another and start winding your yarn around the circles.
 
Do so until you run out of yarn, then repeat the same process with the second color yarn.
 
Step 4:
Along the edge of your circle, cut you yarn to create your pompom ball.
 
Step 5:
Separate the two sections of cardboard, and in the middle of them, tie around your third piece of yarn (the 50cm / 20” length). Tie and knot it as tightly as you can as this thread will be holding your pompom together.
 
Tie a knot at the end of your third piece of yarn to create a hanging loop. Tear away your sections of cardboard.
 
Your decorative, festive pompoms are now ready to use!

Happy Sewing!

Tuesday, November 8, 2016

Why you should be sewing the festive season


festive season sewing craft
There are few things quite as fulfilling as creating something from nothing with your own two hands.
Whether you are creating something as a first timer, and learning a new skill, or whether you are using well practiced skills that have taken years to hone, the sense of accomplishment is always there.
My favorite part of the festive season, is that I get to spend hours creating gifts for my loved ones. I usually begin to plan these things months in advance.
I start by making a list of the people I want to create a gift for, and my budget for each person. I then spend time and thinking about each person, one at a time. I think about what kind of person they are, what they mean to me, and what kind of gift I think they would like to receive. For each person I usually create a list of about five ideas, and work it down to my favorite on the list (though sometimes if there’s extra time, I might create a second complimentary gift... if I like them enough). This list also gives me good ideas for back up gifts, in case the first idea doesn’t quite work out.
There is something magical about creating a unique gift for a special person in my life, and putting my time, energy and love into the creation of that gift. I also find it to be incredibly therapeutic.
I work so hard on each gift, making it something that I would be exceedingly proud of, and then I get to give it away to someone special to me. It truly is a joyful process.
I believe that everyone should, in their own way, create and give gifts in the same manner. I also love receiving homemade gifts, because I know the love that goes into it, and that beats shop bought gifts every time. It’s easy for anyone to simply buy and give a gift, but there’s nothing quite as special as making and giving gifts from the heart.
Why not start with something small? Have a look at our stocking fillers section on our website.

Products of the week

Family portrait cross stitch


Here’s something different to try this festive season. If you love to cross stitch, or know of someone who does, why not turn your family’s Christmas portrait into a cross stitch pattern? Turn a treasured memory into a homemade keepsake!


Make it Sew

 We have launched our first eBook on our site (also available through amazon.com). If you have a passion for sewing and perhaps are considering starting your own dressmaking business (or already have), then this is the book for you!

This is a comprehensive guide on starting and maintaining your own, sew from home business, the author covers all the obstacles you may face and offers advice and tips on how to resolve them, or prevent them from occurring. 
You will be given tips and guidelines to help you with everything from dealing with the processing of orders, working with clients, marketing and basic accounting skills. Everything you need to make a success of your small business.
If you ever wanted to start your own dressmaking business, or even if you already have, then this book's valuable information is definitely worth the read.

Happy Sewing!

Friday, November 4, 2016

Sewing for an androgynous look

Androgynous fashion
Androgynous fashion is a style that aims to avoid gender stereotypes. The androgynous dress or style themselves to look like neither a typical boy nor a girl –rebelcircus.com
 Androgynous Fashion Julie Andrews
Julie Andrews Rocking the Androgynous look
A lot of ladies who are interested in wearing the androgynous look tend to struggle to find clothing in retail stores. The clothing supplied is usually too feminine, especially as far as suits go, as a result these ladies usually turn to having clothing custom sewn for them.
We wish to make finding sewing patterns and designs easy for androgynous ladies, and so we have created a separate section to viewed, just for this specific style. Click Here for more information.

Patterns of the week

Our Ladies Simple Waistcoat

 
This ladies waistcoat is extremely stylish, including front slit pockets, and straps with a buckle at the back. It will bring class and elegance to your professional wardrobe.

Our Ladies standard shirt

 
Our ladies standard shirt pattern is designed to be a well fitted shirt. With clean, neat lines, this shirt will have you looking at your best. Perfectly suited to a professional wardrobe.
This pattern includes sizes 4(28) to 14(40)

Happy Sewing!