Patterns

Thursday, September 29, 2016

Fright Night

I can barely believe that it’s the last week of September and that we are already heading into October. It’s also a really good time to start making sure all your Halloween decorations and outfits are ready.

Pop onto our website and view our growing range of Halloween themed projects. Our range will be growing throughout the month of October, so pop on as often as you like for regular updates.


Patterns of the week


This incredibly fun party dress is perfect for the season. A stylish short, A-line party dress with a bat wing inserted into the seams makes it both fun and stylish.

 
How fun is this Ninja Turtle themed mask - and it's so easy you can make it in just minutes! Why not make the whole set in all the colors.
It is also easily adaptable as a basic super hero mask for all our masked friends during the fun Halloween festivities.
This is also a fun and easy pattern for children and first time knitters to try!

We have many more Halloween themed patterns available, click here for more information.


Tutorial of the week


Trick or Treat bags


This is a quick guide on how to print your own iron on prints for Halloween themed, trick or treat  bags. This idea is really great for Christmas themed gift bags as well.

You will need:
·         Our really easy drawstring bag pattern (available in my online store, click here for more info)
·          Thick iron on interfacing (must be quite hard, similar to cardboard)
·         An ink jet printer.

Step 1:

First I cut out a really thick iron-on interfacing to the size of A4 sheets, and placed them in the feeder tray of my ink jet printer, making sure the glue is on the opposite side to be printed.
 

Step 2:

I got some awesome pictures off the internet and printed them (as I would paper), though you can print any image you like, even photographs of friends and family - or your favourite cat.
 
Step 3:

I cut out the images and ironed them onto the main fabric of the bags. The best time to do this is after cutting out the pattern pieces of the drawstring bag, but before sewing it all together.
 

Step 4:

Finish putting your drawstring bags together, according to the pattern and instructions of my Easy 10 Step Drawstring Bag
 

Step 5:
Share your awesomeness and your new bags with friends and family.


Happy Sewing!

Friday, September 23, 2016

Upcycled Knitwear

Get out those knitting needles and get ready to transform something old into something new once again.

Even knitwear and knitted goodies can be given a new lease on life. I’ve seen old sweaters become pet beds. Sweater sleeves become doggy jerseys (so something I have done myself) and old unwanted knitted goodies become an exciting new array of children’s toys.

Today we are sharing with you an exciting tutorial on how to turn an old beanie into a new, fun bag.

Upcycling can really be so much fun... and it’s also a great way to keep kids busy during the upcoming festive holidays. 

Pattern of the week


This really easy knitting pattern will help you to keep your toes cold this winter. Snuggle up with these on a chilly night, you can even wear them as bed socks to keep your toes warm.
They're so easy to make that you will find yourself making them for all your friends and family!
 

Tutorial of the week


Upcycled Beanie Bag

  TO 

We just adore this idea of Upcycling an old winter beanie into a cute hand bag

What you will need
1 old beanie
A ball of yarn and knitting needles (we used Funky Strips yarn and 4.5mm knitting needles (Imperial and US needle size 7)
A button

Steps
  1. For the shoulder strap: Cast on 12 stitches. Knit as many rows as you need for the desired length of your strap, and to go around your beanie
  2. When your shoulder strap is complete, hand stitch it to your beanie
  3. For the button flap: Cast on 12 stitches and knit 50 rows.
  4. Cast off 6 stitches, and knit the desire length according to your button (you are knitting a loop that is going to go around your button.
  5. Cast off, bend around and stitch your cast off stitches end to the section where you previously cast off 6 stitches, to create your button loop.
  6. Centre your overlap and stitch it to the opposite opening of your beanie
  7. Fold it over and find the position where you will stitch on your button, mark and add button.

Your upcycled beanie bag is now complete, enjoy.


Happy Knitting!

Tuesday, September 20, 2016

Upcycling, new life for old things

I really enjoy the concept of being able to make old things new once again. I can spend hours on Pinterest going over the thousands of pictures of upcycled items that ingenious people have managed to recreate.

This week I wanted to try my hand at doing just that, by turning some old jars into 4-in-1 button organisers... I had so much fun and I loved them so much that I’m making a few more for stocking fillers for the upcoming festive season!

Pattern of the week


Last week I digitally created some minions as a way to sharpen my digital drawing skills, as a result I found myself inspired to create the cross stitch embroidery patterns.

We love these little yellow guys, they really just cheer up our days, and Facebook feeds. Why not embroider a few for yourself, or the little ones in your life this Halloween.

This is a set of 2 cross stitch patterns, a simple pattern, as well as a more complex pattern. Click on the image for more information.


Basic Sewing Course

We are hard at work developing a range of sewing courses for you. We are launching our very first Basic Sewing Course in January 2017. With over 15 years of experience behind us and two diplomas, we are proud to finally be able to share our knowledge and skills with you. 

Over the course of 5 weeks, you will receive 5 video classes cover basic sewing essentials. Once you have successfully completed the classes and assignments, you will receive a certificate on completion of the course.

For more information CLICK HERE


Tutorial of the week

4-in-1 upcycled button jar

 
My daily moisturiser comes in these cute glass jars. I’ve been using them as sewing pattern weights, but lately I have been asking myself what I could use to make them slightly heavier, and more effective as pattern weights. This weekend I was inspired to turn them into button organisers too.

Not only that, but I included a pin cushion on top (for when I use pins instead of weights). But it’s not a basic pin cushion, it’s a pin sharpening pin cushion. How did I manage this? By stuffing my pin cushion with steel wool, instead of standard foam or stuffing. The steel wool sharpens my pins!

What more could a girl want than a button organising, pin sharpening pin cushion of a pattern weight... and they’re so quick and easy to make, I’ve already made myself three!

What you will need
  • Some scrap fabric you have lying around, cut into a circle with a 10cm / 4” diameter
  • Ball of steel wool
  • An old jar
  • Hot glue gun
  • Sewing needle and thread
  • Ribbon
  • Decorations such as more ribbons, bows, buttons, etc
Steps

Step 1: Gather your circle of fabric by feeding your thread along the edges. Stuff your circle of fabric with as much steel wool as possible and sew closed.
 
Step 2:  Hot glue your stuffed circle onto the lid of your jar, open side down.
 
Step 3: Hot glue your ribbon around the jar, covering the join between your fabric and lid.
 
Step 4: Your lid is now ready for you to add all your decorative features. Go crazy, and feel free to share your creations with us on Twitter @MySewingPattern

Your new button organiser is ready to use!
 

Happy Sewing!

Thursday, September 15, 2016

We have officially launched NonStopCraft

Yay! We recently launched our own website, packed full of crafting patterns for knitting, sewing, embroidery, coloring in pages and soon crochet patterns too. Pop onto the site and have a look as well as take advantage of our very awesome launch special


Patterns of the week


This week we are all about bags, check out our growing collections of bags of all kinds.


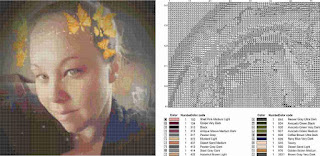
 We will take your favourite images, and transform them into cross stitch patterns for you, and you can use them to decorative your home, and make them as gifts for those you love.
  1. An image, showing how your embroidery will look
  2. A Pattern showing the breakdown of stitches (black and white legend)
  3. A DMC color chart to assist you in choosing the right colors
Not only that, we will give you at least two different embroidery options, that will vary slightly in color and stitch options, so that you have both an easier and more difficult version of the embroidery pattern. 
The best part, it will be sent to you digitally, to be stored on your home computer, and printed whenever you need it, with just 3 short days.
For more information, click on the images below


Happy Sewing!


Friday, September 9, 2016

Heart of the home

The Kitchen most definitely is the heart of the home. It’s where meals are prepared with love for our friends and families, so it’s no wonder that we are inspired to create handmade with love finishes to decorate it.


Pattern of the week


I absolutely loved this idea from the moment I first discovered it.

There are few things more frustrating than finding that your non-stick pans have become scratched while being stored in the kitchen drawer. This is such a simple solution, a really easy knitting pattern that helps to protect my pans... and they make fabulous gifts for friends and family, especially those who are celebrating their housewarming! 


Embroider your favourite pictures


We will take your favourite images, and transform them into cross stitch patterns for you, and you can use them to decorative your home, and make them as gifts for those you love.


1. An image, showing how your embroidery will look
2. A Pattern showing the breakdown of stitches
3. A DMC color chart to assist you in choosing the right colors
Not only that, we will give you at least two different embroidery options, that will vary slightly in color and stitch options, so that you have both an easier and more difficult version of the embroidery pattern. 

The best part, it will be sent to you digitally, to be stored on your home computer, and printed whenever you need it, with just 3 short days.

For more information, click on the images below


Happy Knitting!

Tuesday, September 6, 2016

Kitchen Goddess


Us creative people generally love to cook just as much as sewing or knitting, it really is a different outlet for creativity in many ways. This week we would like to show how all of our mad skills can complement each other... using our sewing and knitting skills to help to kit us out in the kitchen


Pattern of the week


Cook in Vintage style with this absolutely adorable apron. Impress your friends and family with your fashion skills before impressing them with your awesome cooking skills.

As a rather messy chef, the one thing I love about the vintage style aprons is that the skirt is fuller and goes more around the sides, not just covering up the front, so that is one of the things that I really wanted to incorporate into the design of this apron.


Sewing find of the week


We love our cross stitch patterns, they are handmade with love! One of our absolute favorites is the cute strawberry, which can be embroidered onto all your kitchen and home goodies to add a little something different.

This set of two patterns includes an incredibly complex strawberry design, as well as a very quick and easy design.


Convert your pictures into cross stitch patterns


A new service that we are offering, turn your favourite memories and pictures into cross stitch patterns. Click on the image for more information.


Tutorial of the week


Super Easy Oven Mitts

What you will need

  • A5 sheet of paper, a ruler and a pencil for creating your pattern
  • +-30” / 75cm of woven, cotton ribbon or bias binding (for the edging)
  • 10” / 25cm width of fabric at least 30” / 75cm long
  • Quilting / padding / thick fleece (for the inner heatproof padding) 10” / 25cm width by 6” / 15cm length

Steps

  1. Pattern:
    1. On your piece of paper, trace out a rectangle that is 20cm x 12cm / 8” x 5”. Draw a line down the center of your pattern.
 

    1. In one corner, draw a curved edge.
 

    1. Cut out your pattern. Fold it in half, and then in half again (so that it’s a quarter) and cut all 4 corners along the curved corner you had previously made
 

  1. Cut out your fabric. Cut four sections of fabric using the full pattern. Cut out 4 sections of fabric using half the pattern.
 

  1. Use two sections of the fabric to cut out your padding. (creating the inner side of your mitts)
 

  1. On your four half sections, along the edge without curved corners, sew a hem by folding your fabric to the wrong side by 1cm / 3/8”. Fold over a second time and stitch flat.
 

  1. Take the half sections and place them on top of a full section (wrong side of half section against right side of full sections. (creating the outer side of your mitts) 
  1. Pin these to the fabric sections you had used to cut out your padding (wrong side against padding) so that you are sandwiching all the layers together. Stitch all the sections together, joining all of your fabric and padding sections together.
 

  1. Measure out two sections of ribbon / bias binding, 10cm / 4” long. With it folded in half, stitch it closed.
 

  1. Fold this ribbon section in half and baste it to one of the corners of your oven mitts, on the outer side.
 

  1. Sew your ribbon / bias binding, right side against outer section of mitt, as close to the edge as possible.
 

  1. Fold over the raw edges and using a small zigzag stitch, sew your binding edges flat.


Your brand new oven mitts are now ready to use!


Happy Sewing!

Friday, September 2, 2016

Pamper Essentials


The tough month of August has finally gone! Start a new month and the weekend feeling fabulous, spoil yourself with a home pamper session... why not invite the girls over and make an afternoon of it, perhaps throw in a bottle of champagne!

Pattern of the week


 This knitted set is perfect for the beginner knitter. We love these cute little slippers and the headband is perfect for keeping your hair back during pamper sessions, or just during daily cleansing, moisturizing and make up sessions.

Make a set for yourself, or make a couple of sets for a girls’ day with your besties. These also male great last minute gifts as well stocking fillers for the upcoming festive season.


Find of the week


For the first time ever I found myself knitting with boucle wool.. and it is just wonderful and luxurious. I made these bath time scrubby, and let me tell you, using boucle has made it the most wonderful bath time scrubby I have ever owned


 Share your knitting or crochet products


If you have an Etsy store that sells physical knitting or crochet products and notions, and would like to feature them with us on social media, or in our blog, please click on the image for more information.


Happy Knitting!